Dec 17, 2015
Hangouts Post II: Connecting to the World
Dec 11, 2015
Hangouts Post I: Connect with a Colleague
- Accessing Hangouts for the first time
- Searching for colleagues
- Starting a text based chat
- Doing your first video chat
- Sharing your screen with you colleagues
Computer Science Education Week Recap
Learning in New Dimensions with Google Classroom and GeoGebra

Editor's note:Mark Kaercher teaches mathematics at Shaker High School in Latham, New York. He is also one of his school district’s Instructional Technology Resource Teachers. Here, Mark shares his experience with using Google Apps for Education alongside GeoGebra, available as an app for Chrome and now as a native Android phone app.
Every so often, over the course of a long teaching career, we find a special tool or resource that makes us wonder how we ever taught without it. Personally, I’ve had a lot of success with GeoGebra, a free mathematics program for teachers and students. GeoGebra lets me build and share interactive worksheets that demonstrate geometry and algebra concepts. Along with relying on it myself, I’ve helped other educators use GeoGebra by creating how-to videos and leading training sessions.
Dec 3, 2015
Video Conference with Google Hangouts

Hangouts have arrived for teachers through our district Google Apps for Education (GAFE) accounts. This is a wonderful resource that can be used to bring a variety of educational opportunities in our classrooms.
- Create teacher groups (grade level, teams, departments, etc...) and keep in touch through text messages
- Conduct video conferences to streamline cross district PLC meetings
- Connect with teachers/groups outside of the district for professional learning opportunities
- Share your screen with other teachers/coaches to help troubleshoot problems
- Connect your classroom to classes around the world for exciting learning opportunities
- And much more!
To start using Hangouts, navigate to https://hangouts.google.com or download the app on your personal devices. Once you login with your district Google account, you will be all set to start finding others and starting the collaboration!
We will be releasing a series of Teacher's Corner posts that highlights these different uses. Check back each week for new information, and if you want to dive in headfirst, contact your instructional technology coach!
Sean Mullins | Instructional Technology Coach
Embed Video in Mastery Manager Questions!
Has there ever been a quick clip that you wanted to embed in your Mastery Manager assessment? Does your class contain many visual elements that would benefit from videos in your assessments? Would you like to model questions for your students in a format that will appear on the PARCC exam? All of these things are now possible with the ability to embed video into your Mastery Manager assessments!
Imagine this scenario. You are a PE teacher leading a unit on Dance. For part of your assessment you want your students to view examples of dance that were conducted by yourself or other students, and pick out techniques, mechanics, and more! This system is wonderful for any assessment that involves process rather than simple recall. So how do you do it?
When a video is added to your district Google Drive account, you have the option to set its sharing permissions to "On - Anyone with the link". You'll also want to make sure that the permissions are set to "Can view".

Now accessing this video does not require signing into a Google account. The next step is to find a way to embed the video into a Mastery Manager question.
To find the embed code for your video, you'll want to follow these steps.
Now that we have the code, we can open a Mastery Manager item bank and create a new question (question type does not matter). Click on the Source button and then paste your embed code into the response box. You can adjust the size of the embedded video by changing the height and width values in the embed code.

When you are finished, click on the Source button again and scroll to the bottom and click Save. The video will not preview correctly in your Layout screen, so for a preview of what it will really look like, jump over to the Preview menu. If you do not like the size of the video, you can go back to your Layout screen, click the Source button, and adjust the height and width values until you are happy!

To see a very simple example live and in action, click here and use the test code K2ZPW, followed by any random set of numbers as your "student ID". Let your instructional technology coach know how you would like to use this resource and we would love to sit down and work with you!
Sean Mullins | Instructional Technology Coach
Imagine this scenario. You are a PE teacher leading a unit on Dance. For part of your assessment you want your students to view examples of dance that were conducted by yourself or other students, and pick out techniques, mechanics, and more! This system is wonderful for any assessment that involves process rather than simple recall. So how do you do it?
Google Drive Video Sharing
When a video is added to your district Google Drive account, you have the option to set its sharing permissions to "On - Anyone with the link". You'll also want to make sure that the permissions are set to "Can view".

Now accessing this video does not require signing into a Google account. The next step is to find a way to embed the video into a Mastery Manager question.
Embed Code in Google
To find the embed code for your video, you'll want to follow these steps.
- Open your video in Google Drive.
- Click on the Pop-Out icon in the upper right of the window.

- In the new window that opens, click on the three-dots icon and choose "Embed item..." This will open a popup window that contains the embed code that you need for Mastery Manager. Copy this code (Ctrl+C).


Putting it Together in Mastery Manager
Now that we have the code, we can open a Mastery Manager item bank and create a new question (question type does not matter). Click on the Source button and then paste your embed code into the response box. You can adjust the size of the embedded video by changing the height and width values in the embed code.

When you are finished, click on the Source button again and scroll to the bottom and click Save. The video will not preview correctly in your Layout screen, so for a preview of what it will really look like, jump over to the Preview menu. If you do not like the size of the video, you can go back to your Layout screen, click the Source button, and adjust the height and width values until you are happy!

To see a very simple example live and in action, click here and use the test code K2ZPW, followed by any random set of numbers as your "student ID". Let your instructional technology coach know how you would like to use this resource and we would love to sit down and work with you!
Sean Mullins | Instructional Technology Coach
Nov 6, 2015
Google Cultural Institute
The aim of the Cultural Institute is to preserve and promote culture online
If you have not had a chance to browse the Google Cultural Institute, I highly recommend it. Outside of simply navigating the art museums and wonders of the world, you can examine primary source material on major historical events in history.

Finally, if access through our district Google accounts, you can create your own personal lists of personal collections that you value, curate your own galleries, and even push all of this material to your Google Classroom courses!
This is a powerful tool, and one that can be incorporated in to a wide variety of curricula. Check out the YouTube Channel dedicated to the Institute. Go explore today, and make sure to share your experience with your peers!
Sean Mullins | Instructional Technology Coach
Oct 23, 2015
Viewing Activity In A Shared Folder
Do you have a shared folder in Google Drive and want to know if anything new has been added? Using the "Details" button allows you to view all of the activity that has occurred within that folder. Select the folder, click the details button, and view all of the files that have been added to that folder.

Oct 19, 2015
Doodle4Google 2015
Each year Google holds a contest for children in which they can create and submit a Google Doodle that could make it on the front page of their search engine. They have a site dedicated to lesson activities surrounding the event as well. Prizes range from a personalized shirt with their Doodle printed on it, all the way up to collage scholarships and educational grants for the student's school. But in the end, it's all about promoting creativity and highlighting the talents that we see in our schools everyday. For more details, check out the main Google Doodle page, and read some of the "About" information below. Happy doodling, and check out the wonderful winning artwork of 11-year old Audrey Zhang!

Doodle 4 Google is an annual contest open to students in grades K-12. Students are invited to create their own Google doodle for the chance to have it featured on the Google homepage.
There are a million and one facts, interests, and quirks that make everyone unique. For centuries, artists have created paintings, sculptures, self-portraits, and more to offer insights into their personalities and values. Now, we're asking kids to do the same by creating a doodle that shows the world what they're passionate about, what gets them excited, or what they dream about. In other words, we're asking that this year's doodles explain "What makes me...me."
Doodles are meant to surprise and delight people when they visit the Google homepage. Past Doodles have celebrated some of the most brilliant, talented, and passionate people throughout history. Doodle 4 Google offers students K-12 an opportunity to display their own artwork on the Google homepage.
We've been hosting the Doodle 4 Google contest every year in the U.S. since 2008, so this is our eighth year. This website shows details for the U.S. only contest, but the Doodle 4 Google contest takes place in many other countries throughout the year as well.
Audrey Zhang, an 11-year old from New York, was the Doodle 4 Google 2014 U.S. winner. Check out her Doodle and all of the 2014 U.S. finalists here.
What is the "Doodle 4 Google" contest?
Doodle 4 Google is an annual contest open to students in grades K-12. Students are invited to create their own Google doodle for the chance to have it featured on the Google homepage.
Why did you choose the theme "What makes me...me."
There are a million and one facts, interests, and quirks that make everyone unique. For centuries, artists have created paintings, sculptures, self-portraits, and more to offer insights into their personalities and values. Now, we're asking kids to do the same by creating a doodle that shows the world what they're passionate about, what gets them excited, or what they dream about. In other words, we're asking that this year's doodles explain "What makes me...me."
Why is Google doing this contest?
Doodles are meant to surprise and delight people when they visit the Google homepage. Past Doodles have celebrated some of the most brilliant, talented, and passionate people throughout history. Doodle 4 Google offers students K-12 an opportunity to display their own artwork on the Google homepage.
How long has Google been doing this contest?
We've been hosting the Doodle 4 Google contest every year in the U.S. since 2008, so this is our eighth year. This website shows details for the U.S. only contest, but the Doodle 4 Google contest takes place in many other countries throughout the year as well.
Who was the 2014 winner?
Audrey Zhang, an 11-year old from New York, was the Doodle 4 Google 2014 U.S. winner. Check out her Doodle and all of the 2014 U.S. finalists here.
Oct 9, 2015
Google Sharing Pt. 4 - Being Safe While Being Public
With the freedom of the internet comes the discussion about what it means to have material public. It is very important that you and your students understand how to take advantage of open publishing to the web, but also how to do so safely and how to keep your content protected.This is a large topic with constant discussion, so we will simply touch on a few big points and then encourage you to continue the learning and continue the conversation. There is a digital citizen Twitter chat that occurs twice a month (2nd and 4th Wednesdays at 7:00 PM CST) using the hashtag #digcit - check it out!
Protect What is Yours
When you make your work public, you need to consider whether you want others to be able to download or make a copy of your work. If you choose the "publish to web" route, people cannot make a direct copy of the file, nor can then download it. But if you "share a link" to the public, you will want to check the box to not allow individuals to download or make a copy of the file.
[caption id="attachment_2765" align="aligncenter" width="300"]
 Click to view full screen[/caption]
Be Careful What You Publish
This one is simple. Your personal information should remain just that; personal. Do not provide a public link or publish any documents that contain personal information about yourself or anyone else. Students should especially be made aware of this fact, as they are bombarded constantly by social media on which people routinely post personal information. It is part of the social contract of education that we help kids navigate through this new era of digital citizenship, and we first need to be good models ourselves.
Part 2 – Public Link Sharing Ideas
Sean Mullins | Instructional Technology Coach
Google Sharing Pt. 3 - Publishing Ideas
There are two important distinctions between publishing and providing a public link to your Google Drive files.
Publishing can only occur with Google files (docs/sheets/slides).
Publishing does not provide access to the original file. Rather, a webpage is created that displays the content of the original Google file.
So publishing serves the purpose that naturally arises from the distinctions above; you can provide a public viewing of content from a Google file. Let’s look at how this can be beneficial in our classrooms!
Publishing certain results from a Google Form
Sometimes you may want to publish some, but not all, of the results from a Google Form. For example, you gather information from your student's parents about what types of dishes they will bring to a grade level cookout. It might be valuable to make public the list of dishes that will be brought, but the names of who will bring them are not necessary for people to know. By publishing only certain tabs from a Google Sheet, or by hiding certain columns in a Sheet, you can be public where it is useful, and private where you need to be. By the way, you may be collecting names or email addresses in the first place in order to better communicate with individual parents.
This published Google Sheet shows contact information from participants who attended the STEM EdCamp on Oct. 3rd. Because published files automatically update, no extra work needed to be done by the organizers to display this information. Participants just chose to fill out a Google Form (important to note that this was their choice, and they were aware beforehand of the posting of this information), and then the results were gathered and shared automatically! Also note that I hid the Timestamp column in this instance because that information was not necessary for anyone to view.
Better Communication During Events
In a Teacher's Corner post last year, we outlined how IMEA competitions were streamlined by the use of published Google Sheets. Take a look at that post here, and imagine other ways in which you can make your events more efficient by using this new functionality!
Publish Your “Assignment Notebook”
Building off of the example of Sharing a Public Link to an "assignment notebook" that was talked about in Pt. 2 of this series, you could also publish a version of the same type of Google Doc. This can then be linked too, or embedded into a website such as SchoolWires. Now this published file will be completely uneditable, and will automatically update whenever changes are made to the original Google doc.
Another example of this can be seen on the STEM EdCamp page where we created a schedule and links to session notes.
Make Your Presentations Visible to Parents
If you are using Google Slides to create presentations, you can publish those presentations so that they are visible by the public (read: parents). Here's an example of what I mean.
Part 2 – Public Link Sharing Ideas
Part 4 – Being Safe While Being Public
Sean Mullins | Instructional Technology Coach
Google Sharing Pt. 2 - Public Link Sharing Ideas
So we can now link the public to any file that we store in Google Drive; wonderful, but what does that mean for your classroom? Let’s take a look at some examples of this can be useful.
Google Files Can Now be Editable/Comment-able by Parents
You could always send out Google Forms to parents, but now you can provide links to editable Google docs/sheets/slides to them as well! If you wanted, you can allow them to make copies of these Google files as well.
Students Can Share Their Work More Freely
Imagine the scenario where Jane wants to share her creative writing project with her aunt to read. Perhaps she wants another set of critical eyes to help improve the work, or she is simply proud of her accomplishment and wants her favorite family member to read what she has done. Now she can provide the aunt with the link and regardless of whether the aunt has a google account, it is visible. Remember that any work done on the document is still recorded in Revision History, so don’t worry about the aunt doing all the work and Jane taking credit!
Collaborate with Colleagues Outside of the District
Do you have a peer who works district 87, Olympia, Pontiac, or California? Do you partner with local businesses, bring in speakers from the community, or collaborate with experts in your field from around the world? Now you can share and collaborate on files with anyone! Who will you connect and collaborate with?
Assignment Notebooks for Students/Parents
Do you or your team/grade level have a Google Doc or Sheet that you use to bring together assignments for your kids? It’s a great method for teachers to be able to easily edit the document and add their assignments/daily work, and then have the document be visible to students. Well, now you can put a link to that file someplace where your parents can access it as well. Keep them in the loop and extend that assignment notebook to the parents as well! This this link sharing format, you could allow commenting by your parents (which would be anonymous unless they signed into their personal Google accounts), or, by default, leave this option disabled.
Share PDF’s or Videos with the Community
If you create materials that would be useful for your parents to be able to view (PDF helpsheets, tutorial videos, flipped classroom videos, etc…), you can now link the community to these resources! Make your classroom videos visible to parents to keep them in the loop!
Part 4 - Being Safe While Being Public
Sean Mullins | Instructional Technology Coach
New Sharing Options in Drive: Part 1 - How To
Teachers and students now have more freedom with their sharing options when working in Google Drive. Sharing options now exist that allow files to be shared with the public. Additionally, certain files can be “published” to the web, turning them into auto-updating websites based on the Google doc/slide/sheet. Let’s take at how to enable these new features in part 1 of this four part blog post series.
Sharing with the “public”
When sharing a file in Drive, you now have the additional choices seen below.
On - Public on the web. This option allows anyone on the web to find the document through internet search. This is NOT recommended or any of our educational applications.
On - Anyone with the link. This option allows anyone to view/edit/comment (your choice) if they are provided with the link to the document. This has a variety of educational applications that will be discussed in part 2 of this blog post.
[caption id="attachment_2764" align="aligncenter" width="300"]
 Click to view full screen[/caption]
Additionally, it is now important to note a few owner settings that are available. You can prevent people with editing rights to your file from changing who has access to the file, as well as prevent people with “commenting” or “viewing” rights from downloading, printing, or making a copy of the file. This is good for you and your students to understand if they want to really lock down their content and only allow others to view it, and nothing else.
[caption id="attachment_2765" align="aligncenter" width="300"]
Click to view full screen[/caption]Publishing to the web
With the option above, the owner is giving out a link to the original file that is stored in Google Drive. With the “Publish to the web” option, you are instead creating a webpage that is dedicated to that Google doc, sheet, or slide. One distinct advantage of this method is that you can then embed that doc/slide/sheet into another website (like schoolwires, CMS, etc…). Even better; this published document auto-updates when the original Google file is updated! More applications for this are discussed in part three of this blog post, but here is a quick example.
Watch the published Google Sheet of responses update automatically below (Forms are currently experiencing issues, so if this does not display for you, check back later)!
Follow these simple steps to publish a Google file to the web.
Click <File>
<Publish to the web>
Choose <link> or <embed>
Click <Publish>
You can choose additional options by clicking <Published content and settings>
This animation will play on a loop. You can also click on it to start it from the beginning in a new window.

Now that you know how to turn on these features, let’s take a look at how to leverage them for awesome educational experiences for students and increased communication with the community!
Part 2 - Public Link Sharing Ideas
Part 4 - Being Safe While Being Public
Sean Mullins | District Instructional Technology Coach
Oct 2, 2015
Google File Sharing: Who can delete what?
One question that I receive often revolves around the permissions that students/staff have when files are shared with them in Google Drive. If someone shares a file with you and makes you an editor, can you delete the file? If I move a folder from Shared With Me into My Drive, what happens if I delete it? Here are some tips for handling sharing in Google Drive.
The dreaded Shared With Me space! Anytime a file or folder is shared with you, it will appear in this space. Here are something things to know about Shared With Me.

What follows is directly from the Google support pages concerning the sharing of items. They provide a handy chart that shows what a person can do with an item depending on the permissions they have been given.
When you share a file or folder with other people, you have the choice to give them viewing and editing access, as well as ownership of the file. While not applicable to folders, you can also give commenting access to files in order to get feedback from the people you're sharing with. You can change this access at any time.
Here’s what people can do in a file or folder as a viewer, commenter, editor, or owner:
After you’ve shared a file with others, you can change the type of access specific people or groups can have.
If you are the owner of a file or folder, you can choose to remove editors’ ability to share files with others in Google Drive, Docs, Sheets, and Slides. This allows you to control everyone who is able to view or edit the file or folder.
If you have any questions about sharing within Google, please get in touch with your building/district instructional coach.
Sean Mullins | District Instructional Coach
Shared With Me
The dreaded Shared With Me space! Anytime a file or folder is shared with you, it will appear in this space. Here are something things to know about Shared With Me.
- Items in this space will not automatically sync down to your computer if you using the Google Drive App for PC.
- Items can be moved from Shared With Me into any folder in My Drive. This will cause the files to sync down to your computer.
- If you move items out of Shared With Me, what you are essentially moving is a link to the item, not the item itself. These means that if you "remove" or "delete" these items from your My Drive space, you are just removing the link, not the original items. As you will see below, only the owner of items has the ability to permanently delete.
- If you have an important item that has been shared with you, my suggestion is to "Star" the item rather than move it into your My Drive space. Doing so will keep it in Shared With Me, but put a direct link to it in your Starred space. This way you do not have to search for it in Shared With Me, and you do not have to clutter your personal My Drive space.

Direct from Google
What follows is directly from the Google support pages concerning the sharing of items. They provide a handy chart that shows what a person can do with an item depending on the permissions they have been given.
When you share a file or folder with other people, you have the choice to give them viewing and editing access, as well as ownership of the file. While not applicable to folders, you can also give commenting access to files in order to get feedback from the people you're sharing with. You can change this access at any time.
Here’s what people can do in a file or folder as a viewer, commenter, editor, or owner:
| Can view | Can comment | Can edit | Is owner | |
|---|---|---|---|---|
| View files and folders | x | x | x | x |
| Download or sync files to another device | x | x | x | x |
| Make a copy of files to save in Google Drive | x | x | x | x |
| Comment and suggest edits in files | x | x | x | |
| Edit documents, spreadsheets, presentations, and drawings | x | x | ||
| Share or unshare files with others | x | x | ||
| Add or remove files from a folder | x | x | ||
| Upload and delete file versions | x | x | ||
| Delete files and folders | x | |||
| Transfer ownership of files and folders to others | x |
Change what others can do with your file
After you’ve shared a file with others, you can change the type of access specific people or groups can have.
- Open the file.
- Click Share in the top-right corner.
- Click Advanced in the bottom-right corner of the sharing box.
- Using the dropdown menu next to the user’s name, select the type of access you want them to have.
- Click Done.
Remove sharing privileges
If you are the owner of a file or folder, you can choose to remove editors’ ability to share files with others in Google Drive, Docs, Sheets, and Slides. This allows you to control everyone who is able to view or edit the file or folder.
If you have any questions about sharing within Google, please get in touch with your building/district instructional coach.
Sean Mullins | District Instructional Coach
Oct 1, 2015
Google Keep
I love using the Sticky Notes program on my Windows laptop. Sometimes my screen would be filled with these reminders and checklists, all color coded using some system that I pretend to understand.
This system worked okay, but it did have limitations.
Enter Google Keep. All of the limitations presented above are solved with this district integrated organizational tool! Take a look at the video below to familiarize yourself with how you could use Google Keep to facilitate educational opportunities.
Keep in mind (see what I did there...) that one of the great features of this system is that users can install the Google Keep app on their personal devices (phones/tablets/etc...) to keep track of their notes and reminders. Students can use this to their advantage when sharing notes and collaborating with their peers!
Sean Mullins | Instructional Technology Coach
 |
| Not too far off from my normal Unit 5 checklist |
This system worked okay, but it did have limitations.
- What if I was not on that specific computer? My lists don't travel with me.
- What if I wanted a checklist? Not possible.
- What if I wanted another person to see and co-edit my lists? Not possible
Enter Google Keep. All of the limitations presented above are solved with this district integrated organizational tool! Take a look at the video below to familiarize yourself with how you could use Google Keep to facilitate educational opportunities.
Keep in mind (see what I did there...) that one of the great features of this system is that users can install the Google Keep app on their personal devices (phones/tablets/etc...) to keep track of their notes and reminders. Students can use this to their advantage when sharing notes and collaborating with their peers!
Sean Mullins | Instructional Technology Coach
Sep 18, 2015
Instant Peer Feedback with Google Forms
Peer feedback can be a valuable tool during the learning process. It can be done before a final product is crafted, or as a way for students to provide commentary and suggestions on a final product. Facilitating this feedback can be accomplished in a variety of ways, from verbal "sandwiches" to hand written slips of paper and many other techniques in between. But often you have to choose between immediacy and anonymity when deciding on which method to use. A verbal form of feedback puts the students giving feedback in the situation of modifying their comments due to the public nature of the forum. Anonymous paper slips require collection, distribution, and time on the feedback receiver's end to rifle through the slips to get an idea of the feedback given. This leads to delay in reflection, and the longer it takes to reflect, the less effective the reflection is. Using Google Forms and an add-on called docAppender, you have the best of both worlds!
With this feedback method, students will be filling out a Google Form to provide feedback to their peers. The feedback will then instantly appear in a Google Doc that the the original student can see and reflect upon. This system allows for anonymity and instant feedback, two things that are vitally important for students. But as the teacher, you can always see who provided what feedback so that you can manage anyone who is critical without reason. Here's how it works...
First, we need a file that will belong to each student and collect their feedback. We will create one in Google Docs and then push it out to all of our students via Google Classroom. Here is a sample of what this template can look like...

In this example, the template includes a prompt and space for the student to reflect on the feedback that they receive.
Create a new Google Form. Navigate to the top of the form where you will see a menu that is called Add-ons (Note: currently [9.18.15] the new version of Forms does not have the ability to use Add-ons. Revert to the old version if needed.). Open the Add-ons menu and choose Get New Add-ons. Search for the docAppender Add-on and add it by clicking on the +Free button. Finally, make sure that the Add-on sidebar is running. You may need to go back to the Add-ons menu > docAppender > Open Sidebar. In the end, your form should look like this.

With the sidebar open, we can now finish creating our form. First, we need to add a question that will allow students to choose the person to whom they are providing feedback. That question is typically best as the "Choose from list" question type (see Question 1 in the image above). Second, we create feedback questions for the rest of our form. These typically follow a rubric that you have previously provided to students. Lastly, we follow the steps outlined in the docAppender sidebar.
Now you can make the form available to your students by putting the live form link on your CMS, Google Classroom, or web page. Below is an example of what the finalized feedback document would look like for a student.

This is an extremely valuable and flexible feedback system that has been universally praised by every teacher who I have worked with. If you are interested in trying it out, I highly recommend contacting your instructional technology coach to help walk through the process and provide support.
Sean Mullins | Instructional Technology Coach
Overview
With this feedback method, students will be filling out a Google Form to provide feedback to their peers. The feedback will then instantly appear in a Google Doc that the the original student can see and reflect upon. This system allows for anonymity and instant feedback, two things that are vitally important for students. But as the teacher, you can always see who provided what feedback so that you can manage anyone who is critical without reason. Here's how it works...
Setting Up the Google Doc Template
First, we need a file that will belong to each student and collect their feedback. We will create one in Google Docs and then push it out to all of our students via Google Classroom. Here is a sample of what this template can look like...

In this example, the template includes a prompt and space for the student to reflect on the feedback that they receive.
Feedback Form
docAppender Add-on
Create a new Google Form. Navigate to the top of the form where you will see a menu that is called Add-ons (Note: currently [9.18.15] the new version of Forms does not have the ability to use Add-ons. Revert to the old version if needed.). Open the Add-ons menu and choose Get New Add-ons. Search for the docAppender Add-on and add it by clicking on the +Free button. Finally, make sure that the Add-on sidebar is running. You may need to go back to the Add-ons menu > docAppender > Open Sidebar. In the end, your form should look like this.

Creating the Form
With the sidebar open, we can now finish creating our form. First, we need to add a question that will allow students to choose the person to whom they are providing feedback. That question is typically best as the "Choose from list" question type (see Question 1 in the image above). Second, we create feedback questions for the rest of our form. These typically follow a rubric that you have previously provided to students. Lastly, we follow the steps outlined in the docAppender sidebar.
- Choose the folder which holds all of the Google doc templates that your students have opened through Classroom. This will be the assignment folder for the assignment that you created in Classroom to push out the template to your students.
- Choose the question that determines which document the feedback is appended to. This is the "Choose from list" question that we created earlier. When you click "Save and populate selected question", docAppender creates an answer option to choose any of the docs that are present in the folder that you identified in Step 1.
- Choose the questions on your form that you want to be appended as feedback for the students. This allows you to, for example, require that every student provide their own name when giving feedback, but not push that name out to the presenter who is receiving the feedback. This way students can be anonymous to their classmates. But because you require everyone to provide their name on the form, the name will be displayed to you in the spreadsheet attached to this form. That way, you can allow for anonymity and still track responses if anything inappropriate occurs.
- Choose how the feedback will be displayed to students. I recommend "Rows in a single horizontal table".
Now you can make the form available to your students by putting the live form link on your CMS, Google Classroom, or web page. Below is an example of what the finalized feedback document would look like for a student.

This is an extremely valuable and flexible feedback system that has been universally praised by every teacher who I have worked with. If you are interested in trying it out, I highly recommend contacting your instructional technology coach to help walk through the process and provide support.
Sean Mullins | Instructional Technology Coach
Sep 10, 2015
Microsoft Viewer in Google Apps
Do you have PowerPoints which have a lot of animation in them and when you transfer to a Google Presentation the animation gets lost? Well here is a solution for you. Download the Google Drive app Office Viewer for Google Drive. This app will allow students who do not have Microsoft Products on their computer to view PPT presentations in full animation mode.
Go to the New Tab in Drive, More, Connect More apps. In the search area key in Office Viewer and several will pop up. Select this one:

Once the app is installed you will open it. In the upper LEFT hand corner click on the icon below and login to your Google Drive:

Once access has been granted, you will be able to open any Microsoft PPT, Word or Excel docs.
Sep 3, 2015
Google Updates Core Apps
On September 2nd, Google announced a set of updates to many of the core Google Apps that you are familiar with (Docs, Sheets, Forms, etc...). Highlights include Voice Typing in Docs, updated See New Changes feature in Docs, Templates across all apps, a data visualization feature called Explore in Sheets, and an awesome new feature where users of Google Classroom can push out their current webpage to their whole class through Chrome. Check out the full details in the official post below!
Posted by Ritcha Ranjan, Product Manager
School’s in! As you settle into your classes and start to juggle soccer practice, club meetings and homework, we’re here to help. We’ve been spending the summer “break” creating new tools to help you save time, collaborate with classmates and create your best work—all for free.
Schoolwork, minus the work
With Voice typing, you can record ideas or even compose an entire essay without touching your keyboard. To get started, activate Voice typing in the Tools menu when you're using Docs in Chrome. Then, when you’re on the go, just tap the microphone button on your phone’s keyboard and speak your mind. Voice typing is available in more than 40 languages, so we can help with your French homework, too. Voilà!
Do more, together
We’ve made it easier for you to tell what was added or deleted in Docs—and who made the changes. Now when you’ve left a document and you come back to it later, you can just click “See new changes” to pick up right where your classmates left off.

Posted by Ritcha Ranjan, Product Manager
School’s in! As you settle into your classes and start to juggle soccer practice, club meetings and homework, we’re here to help. We’ve been spending the summer “break” creating new tools to help you save time, collaborate with classmates and create your best work—all for free.
Schoolwork, minus the work
Writing papers is now a lot easier with the Research tool in Docs for Android. You can search Google without leaving Docs, and once you find the quotes, facts or images you’re looking for, you can add them to your document with just a couple taps. That means less time switching between apps, and more time perfecting your thesis statement.
With Voice typing, you can record ideas or even compose an entire essay without touching your keyboard. To get started, activate Voice typing in the Tools menu when you're using Docs in Chrome. Then, when you’re on the go, just tap the microphone button on your phone’s keyboard and speak your mind. Voice typing is available in more than 40 languages, so we can help with your French homework, too. Voilà!
Do more, together
We’ve made it easier for you to tell what was added or deleted in Docs—and who made the changes. Now when you’ve left a document and you come back to it later, you can just click “See new changes” to pick up right where your classmates left off.
Forms helps you get a lot of information easily and in one place—so when you want to vote on your class field trip or collect T-shirt sizes for your team, you don’t have to sort through dozens of emails. With the new Forms, you can survey with style—choose one of the colorful new themes or customize your form with your own photo or logo, and we’ll choose the right color palette to match. Easily insert images, GIFs or videos and pick from a selection of question formats. Then send out your survey and watch as the responses roll in!
Your best work, your best you
Creating presentations, crafting newsletters and managing your team’s budget is hard enough without having to worry about making everything look good. With the new collection of templates in Docs, Sheets and Slides, you can focus on your content while we make sure it gets the expert polish it deserves. Choose from a wide variety of reports, portfolios, resumes and other pre-made templates designed to make your work that much better, and your life that much easier.
Mission control, for teachers and students
Rock this school year with Google Docs and Classroom. Your first assignment? Try these new features, which are rolling out today.
Your best work, your best you
Creating presentations, crafting newsletters and managing your team’s budget is hard enough without having to worry about making everything look good. With the new collection of templates in Docs, Sheets and Slides, you can focus on your content while we make sure it gets the expert polish it deserves. Choose from a wide variety of reports, portfolios, resumes and other pre-made templates designed to make your work that much better, and your life that much easier.
With Explore in Sheets, you can now spend less time trying to decipher your data, and more time making a point. Explore creates charts and insights automatically, so you can visualize trends and understand your data in seconds on the web or on your Android. It’s like having an expert analyst right by your side.
Mission control, for teachers and students
A year ago, we launched Classroom to save teachers and students time and make it easier to keep classwork organized. Today we’re launching a Share to Classroom Chrome extension to make it easy for teachers to share a website with the entire class at the same time—no matter what kind of laptop students have. Now the whole class can head to a web page together, without losing precious minutes and focus to typos.
Rock this school year with Google Docs and Classroom. Your first assignment? Try these new features, which are rolling out today.
Google Classroom Updates
Recent updates to Google Classroom have added a new collaboration tool (forum-like questions), the ability to reuse old posts, and the option to move a post to the top of the stream. Calendar integration and more are coming soon too! Read the official post below for all of the details.
Posted by Will Phan, Google Classroom Software Engineer
As you gear up for the new school year, try the newest features in Google Classroom for more ways to save time, engage your students and keep everyone organized. Most of these features are rolling out this week; stay tuned in the next few weeks for more back-to-school goodies in Google Classroom, Google Docs, Sheets and Slides, all designed to help you make this school year yours.
Since Classroom launched last year, teachers have been using their class stream to host student debates, Q&A and discussions. Starting today, you’ll be able to do this in a more collaborative way. You can post questions to your class and allow students to have discussions by responding to each other’s answers (or not, depending on the setting you choose). For example, you could post a video and ask students to answer a question about it, or post an article and ask them to write a paragraph in response.
“Often, teachers want to do a quick check-in on what their students are learning. Now with this built in to Google Classroom, teachers can easily do this on the fly, any time,” said Michael Fricano II, who teaches at Iolani School in Honolulu. “Your class can have a really engaging, focused conversation.”

You know those lessons that worked so well last year that you want to use them again? Now you can reuse assignments, announcements or questions from any one of your classes — or any class you co-teach, whether it’s from last year or last week. Once you choose what you’d like to copy, you’ll also be able to make changes before you post or assign it.
“The reuse post feature gives teachers the gift of time. Making changes to something already created is way easier than starting from scratch,” said Heather Breedlove, Technology Integration Coordinator at Flagstaff Unified School District in Arizona. “It’s working smarter, not harder.”

In the next month, Classroom will automatically create a calendar for each of your classes in Google Calendar. All assignments with a due date will be automatically added to your class calendar and kept up to date. You’ll be able to view your calendar from within Classroom or on Google Calendar, where you can manually add class events like field trips or guest speakers.

Posted by Will Phan, Google Classroom Software Engineer
As you gear up for the new school year, try the newest features in Google Classroom for more ways to save time, engage your students and keep everyone organized. Most of these features are rolling out this week; stay tuned in the next few weeks for more back-to-school goodies in Google Classroom, Google Docs, Sheets and Slides, all designed to help you make this school year yours.
Keep students engaged with question-driven discussions
Since Classroom launched last year, teachers have been using their class stream to host student debates, Q&A and discussions. Starting today, you’ll be able to do this in a more collaborative way. You can post questions to your class and allow students to have discussions by responding to each other’s answers (or not, depending on the setting you choose). For example, you could post a video and ask students to answer a question about it, or post an article and ask them to write a paragraph in response.
“Often, teachers want to do a quick check-in on what their students are learning. Now with this built in to Google Classroom, teachers can easily do this on the fly, any time,” said Michael Fricano II, who teaches at Iolani School in Honolulu. “Your class can have a really engaging, focused conversation.”

Reuse posts
You know those lessons that worked so well last year that you want to use them again? Now you can reuse assignments, announcements or questions from any one of your classes — or any class you co-teach, whether it’s from last year or last week. Once you choose what you’d like to copy, you’ll also be able to make changes before you post or assign it.
“The reuse post feature gives teachers the gift of time. Making changes to something already created is way easier than starting from scratch,” said Heather Breedlove, Technology Integration Coordinator at Flagstaff Unified School District in Arizona. “It’s working smarter, not harder.”
Calendar Integration
In the next month, Classroom will automatically create a calendar for each of your classes in Google Calendar. All assignments with a due date will be automatically added to your class calendar and kept up to date. You’ll be able to view your calendar from within Classroom or on Google Calendar, where you can manually add class events like field trips or guest speakers.

And a few more improvements you’ve asked for:
- Bump a post: When you want to make sure an older item is easy for students to find, you can now move any post to the top of the stream.
- Due dates optional: For long-term projects or student-driven assignments, you’ll now have the option to create assignments that don’t have due dates.
- Attach a Google Form to a post: Many teachers have been using Google Forms as an easy way to assign a test, quiz or survey to the class. Coming in the next few weeks, teachers and students will soon be able to attach Google Forms from Drive to posts and assignments, and get a link in Classroom to easily view the answers.
Aug 31, 2015
Making a Google Calendar Public
Problem
You would love to set up a shareable, editable district calendar through Google Calendar and want the contents to be visible to the public, even if they don't have a Google account.
Solution
Add a secondary calendar to your Google Calendar, and enable full sharing privileges.
Google Calendar can be a quick and easy way to keep track of events, homework assignments, and other school related tasks. A single calendar can be shared with your department, team, or grade level so that everyone can add/edit events on the same calendar. Then, this calendar can be embedded on a website for public view. This enable, for example, a team of junior high teachers to input homework on a calendar each day and have this be visible to parents/students via their team website.
[caption id="attachment_2686" align="aligncenter" width="300"]
 This Google Calendar is used by the Normal West Bands[/caption]
The follow steps are needed in order to set a Google Calendar up in this manner.
- Navigate to your district Google Calendar using the Apps icon (9 little squares) once you are logged into your Google account.
- Create a new calendar by clicking on the down arrow next to My Calendars.

- Provide a name and description for your calendar.
- Check the Share this calendar with others box, followed by Make this calendar public.
- Add any editors to your calendar by filling in their names in the Share with specific people section.
[caption id="attachment_2687" align="aligncenter" width="300"]
 Click to view original[/caption]
- Press Save.
- Once your calendar loads on your main screen, click the down arrow next to it and choose Calendar Settings.

- Scroll until you find the Calendar Address section, and click Change sharing settings. Note that if you want to embed your calendar someplace later, you will find the embed code right above this section.

- You can now choose the See all event details option from the sharing drop down menu.

Now you can embed your calendar and tell the world about it! Let us know how you are using Google Calendars by contacting your instructional technology coaches today.
Sean Mullins | Instructional Technology Coach
May 19, 2015
Google Classroom: What to do when the class is finished?
It's the end of the year (or semester...or quarter) and you are wrapping up your use of Google Classroom with your students. What now? What happens to the files and folders you created? Can you start the same class with new students, or do you need to create a new class from scratch? Here are your answers!
New courses will always need to be created when old courses finish. At the end of the school year or a semester, you may want to archive a class to preserve the class materials, any assignments, and any postings to the class stream. You can still access any class files in Google Drive, but the archived classes are moved to a separate area to help you keep your current classes organized. An archived class can be viewed by you and the students in the class. However, when the class is archived, you can't edit or add anything to the class until you restore it.
Your folders in Google Drive for your Classroom courses will NOT be removed unless you choose to remove them. You may wish to rename these folders so that you can keep them separate from your soon-to-be-created courses. For example, "Science" may be renamed "Science 2014-2015". To take that a step further, you could create a folder named "Archived Courses" in Google Drive and move all of your old course folders into this folder. Organization, as we all know, is the key to maintaining sanity with folder management.
One last note; if you have assignments that you have not returned to your students through Classroom, you are still the owner of those files. If you then delete (or remove) these files from your Drive, they will be gone forever and the student will not be able to retrieve them. If you return all of your assignments, however, the ownership switches back to the students. Deleting (or removing) them does not then delete them permanently, but only removes them from your view. Since the students are now the owner, they are the only ones who can permanently delete the files.
If you have any questions about this, or any end-of-the-year process', please contact your instructional technology coach.
Sean Mullins | Instructional Technology Coach
Archive
New courses will always need to be created when old courses finish. At the end of the school year or a semester, you may want to archive a class to preserve the class materials, any assignments, and any postings to the class stream. You can still access any class files in Google Drive, but the archived classes are moved to a separate area to help you keep your current classes organized. An archived class can be viewed by you and the students in the class. However, when the class is archived, you can't edit or add anything to the class until you restore it.
To archive a class:
- Sign in to Classroom at classroom.google.com.
- On the class card, click
and select Archive.
- To confirm, click Archive.
To view an archived class:
- Sign in to Classroom at classroom.google.com.
- Click
and select Archived Classes.
- Select the class you want to view.
To restore an archived class:
- Sign in to Classroom at classroom.google.com.
- Click
- On the class card, click
To delete an archived class:
- Sign in to Classroom at classroom.google.com.
- Click
- On the class card, click
Final Details
Your folders in Google Drive for your Classroom courses will NOT be removed unless you choose to remove them. You may wish to rename these folders so that you can keep them separate from your soon-to-be-created courses. For example, "Science" may be renamed "Science 2014-2015". To take that a step further, you could create a folder named "Archived Courses" in Google Drive and move all of your old course folders into this folder. Organization, as we all know, is the key to maintaining sanity with folder management.
One last note; if you have assignments that you have not returned to your students through Classroom, you are still the owner of those files. If you then delete (or remove) these files from your Drive, they will be gone forever and the student will not be able to retrieve them. If you return all of your assignments, however, the ownership switches back to the students. Deleting (or removing) them does not then delete them permanently, but only removes them from your view. Since the students are now the owner, they are the only ones who can permanently delete the files.
If you have any questions about this, or any end-of-the-year process', please contact your instructional technology coach.
Sean Mullins | Instructional Technology Coach
May 15, 2015
Start Your Personal Learning Network with Google+
Social media has ushered in a new wave of professional development for teachers all over the world. Personal Learning Networks (PLNs) are simple systems that teachers have in place that help them keep up to date on new trends in education. Social media can and should be leveraged to develop your PLN. Many teachers already frequent Pinterest, Facebook, Twitter, etc... for educational collaboration opportunities. I would like to suggest adding Google+ to that list!
With your district Google account, you have the ability to set up Google+. It is very simple, and only requires you to click on the "+You" link found by your login name once you have signed into your Google Account. You then fill out a few screens of information, most of which you can skip over.
Once you are set up, you can navigate to "Communities" through the menu on the left of your screen and start connecting with educators all around the globe who are trying to accomplish the same goals as yourself. For example, I belong to communities that discuss "Science in Google", "Google Apps for Education", and "Education Revolutions"...and the list will surely grow.
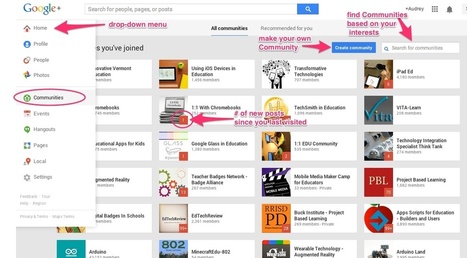
The great thing about these communities is that they are created and moderated by regular people, not organizations. That also means that you can create a community yourself and invite like-minded U5 educators. As an example, I encourage everyone to join the U5 Instructional Technology community (direct link). It's a great place for us all to share, discuss, debate, and encourage around the topic of instructional technology in Unit 5. We will be adding content to it regularly, and encourage you to do the same!
Similarly, maybe your department wants to create a community to share web resources and have discussions around curriculum. If we think even bigger, why not have a U5 Science community and invite all of the science teachers (or anyone for that matter) to join? The possibilities are exciting!
If you would like more information on PLNs or Google+, please contact your district instructional technology coach!
Sean Mullins | Instructional Technology Coach

With your district Google account, you have the ability to set up Google+. It is very simple, and only requires you to click on the "+You" link found by your login name once you have signed into your Google Account. You then fill out a few screens of information, most of which you can skip over.
Once you are set up, you can navigate to "Communities" through the menu on the left of your screen and start connecting with educators all around the globe who are trying to accomplish the same goals as yourself. For example, I belong to communities that discuss "Science in Google", "Google Apps for Education", and "Education Revolutions"...and the list will surely grow.
The great thing about these communities is that they are created and moderated by regular people, not organizations. That also means that you can create a community yourself and invite like-minded U5 educators. As an example, I encourage everyone to join the U5 Instructional Technology community (direct link). It's a great place for us all to share, discuss, debate, and encourage around the topic of instructional technology in Unit 5. We will be adding content to it regularly, and encourage you to do the same!
Similarly, maybe your department wants to create a community to share web resources and have discussions around curriculum. If we think even bigger, why not have a U5 Science community and invite all of the science teachers (or anyone for that matter) to join? The possibilities are exciting!
If you would like more information on PLNs or Google+, please contact your district instructional technology coach!
Sean Mullins | Instructional Technology Coach
Apr 10, 2015
AP French Regional Foods of France Cultural Lesson
 Mrs. Litwiller the AP French teacher and I created a project which concludes a cultural food unit and also prepares the students for AP speaking portion of the AP exam.
After watching student presentations on regional foods of France, students were asked to respond verbally to the Question:
“If you were spending spring break in France traveling with a culinary group, in which region would you want to spend your time and what foods would you want to try during your stay?”
We pushed the assignment out through Google Classroom and asked the students to use Vocaroo to record their responses and copy and paste the link into their Google Classroom assignment. We also required the students to grab the QR code from the Vocaroo site and upload it to Google Classroom, as well.
With the QR codes printed out, Mrs. Litwiller placed them around the room and had the French 2 students use their phones to scan the QR codes. While they listened to their peers they heard about different regions of France in which they may be interested in and might visit in the future.
Here are a couple of examples:
Student 1 http://vocaroo.com/i/s18BeaizCgR4

Student 2 - http://vocaroo.com/i/s18C7P6sX61i

Mar 30, 2015
Connecting Your Google Calendar to Schoolwires
In a recent update, Schoolwires added the ability to connect your Google Calendar to your Schoolwires calendar.
This is great news for those of you who are avid Google Calendar users who also want to keep a Schoolwires calendar up to date. Examples include; a calendar for practices or clubs or a homework calendar. Now you can make the changes on your Google Calendar and have it automatically update your publicly accessible, official Unit 5 calendar.
In order to connect the two, first navigate to your calendar app and click on the Options button.

On the Options page, you will check the Google Calendar Integration button, Connect a new calendar, and then Accept the connection between Schoolwires and Google. After these steps, you can choose which of your Google calendars you would like to bring in information from. You can even connect multiple Google calendars.

Sean Mullins | District Instructional Technology Coach
This is great news for those of you who are avid Google Calendar users who also want to keep a Schoolwires calendar up to date. Examples include; a calendar for practices or clubs or a homework calendar. Now you can make the changes on your Google Calendar and have it automatically update your publicly accessible, official Unit 5 calendar.
In order to connect the two, first navigate to your calendar app and click on the Options button.
On the Options page, you will check the Google Calendar Integration button, Connect a new calendar, and then Accept the connection between Schoolwires and Google. After these steps, you can choose which of your Google calendars you would like to bring in information from. You can even connect multiple Google calendars.

Sean Mullins | District Instructional Technology Coach
Subscribe to:
Posts (Atom)